2FA with SSH

Sometimes, you may find yourself needing to safeguard a single Linux server on the internet while still requiring SSH access for emergencies. For instance, if your VPN service malfunctions, you'll still need the capability to connect to this server via SSH over the internet.
In such a scenario, let's consider an Ubuntu 22 LTS server where I aim to enhance the security of my SSH access by implementing a second factor.
We'll begin by installing the PAM module from Google Authenticator. Of course, you have the flexibility to utilize any token-based 2FA app of your preference.
sudo apt install libpam-google-authenticatorinstall Google Authenticator
Next, add this module to our SSH daemon by navigating to and editing the file located at /etc/pam.d/sshd:
# Add Google Authenticator to ssh
auth required pam_google_authenticator.so
/etc/pam.d/sshd
We must restart the SSH daemon to load our new module:
sudo systemctl restart sshd.servicerestart sshd service
Now, let's adjust the parameters PasswordAuthentication and KbdInteractiveAuthentication in the configuration file /etc/ssh/sshd_config:
# To disable tunneled clear text passwords, change to no here!
PasswordAuthentication no

# Change to yes to enable challenge-response passwords (beware issues with
# some PAM modules and threads)
KbdInteractiveAuthentication yes
/etc/ssh/sshd_config
Initiate the Google Authenticator configuration by running the command:
google-authenticatorinitiate the google-authenticator config
Here are the recommended settings:
- Make tokens "time-based": yes
- Update the
.google_authenticatorfile: yes - Disallow multiple uses: yes
- Increase the original generation time limit: no
- Enable rate-limiting: yes
Upon entering these settings, you'll receive a QR code as a response.
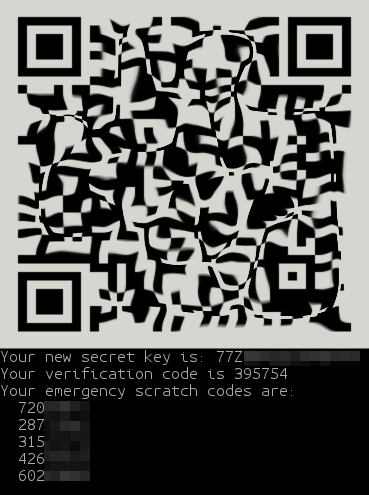
Scan this QR code with your preferred time 2FA app. I personally use Authenticator App from Google.
Once again, restart the SSH daemon:
sudo systemctl restart sshd.servicerestart sshd service
PasswordAuthentication and KbdInteractiveAuthentication, then restart the SSH daemon.That's it! We now have a protected SSH authentication with a time-based factor.
In a subsequent blog post, I'll explore replacing the password prompt with private and public keys for enhanced security. Stay tuned.